Just wanted to update with a quick post with the Spring Blog Hop winner from last Wednesday.
The randomly chosen winner was KW. Please email me at stampingwithheart@yahoo.com so I can get your goodies out to you.
A huge thanks to everyone who left comments on my blog! :)

Wednesday, April 27, 2011
Tuesday, April 26, 2011
It's my turn to host a challenge over at Memorable Seasons and this week's challenge is a really easy one! :) You have until the end of April to submit a project and you will be entered in the monthly drawing. Here is the thread you need to link your cards to when you are finished.
So here's my challenge:
Create a card with a circle background. You can create the circles from anything you'd like: stamps, pattern paper punched circles, etc. Just use your imagination!
Here's my card:
And here's how I created it:


So here's my challenge:
Create a card with a circle background. You can create the circles from anything you'd like: stamps, pattern paper punched circles, etc. Just use your imagination!
Here's my card:
And here's how I created it:
I stamped a circle image stamp in pink ink on my card base. Then I stamped the same image with blue and green ink too. I punched out the image with various sized circle punches and layered them onto the pink image. I punched some of the circles smaller than their original size so that the stamped pink circles would be larger and frame them. This was an easy way to combine the three colors on the background.
Then I cut out a larger circle from pattern paper to frame my focal point and added a photo on top of that. My title is stamped with a small wooden alphabet stamp. I also added jewels to the centers of the circles.
Can't wait see what you all come up with for this challenge! :)
Supplies Used:
Stampers Anonymous Tim Holtz Stamps: Psychedelic Grunge
Ranger Distress Ink Pads: Worn Lipstick, Peeled Paint, Faded Jeans
Marvy Uchida: Marvy Matchables Black Ink Pad
EK Success: Antique Typewriter Alphabet
McGill: Word Tags Punch
WeR Memory Keepers: Corner Chomper
The Paper Studio: Clear Gemstones
Crate Paper: Restoration line
Foam Squares
White Cardstock
Photo Credit: Made By Design.
* All supplies were purchased personally by me.
Wednesday, April 20, 2011
Step into Spring Blog Hop
Hello and Welcome to my blog! Today we are celebrating the beginning of a new season with the Step into Spring Blog Hop brought to you by the Design Team from Memorable Seasons!
If you did not start your hop today on the Memorable Seasons blog , please jump back over there so you do not miss anything. Today we are looking at the word S-P-R-I-N-G and taking you through all the steps for creating a fabulous layout using an exclusive sketch created for this blog hop by Liz Chidester, which was the first step! You have already hopped through the letters S, P and R, and now you are here for the letter I.
The letter "I" will stand for the technique of "inking".
I love adding ink to my layouts--it gives the paper layers so much depth and allows you to customize your layout completely. You can add any type of ink to your layout (ink pads, paint, mists, etc), but I chose to just use ink pads on mine. And you can use as little or as much ink as you'd like...you just have to include it on your layout as part of this challenge.
To add depth to the edges of your paper, just use a foam applicator and an ink pad and lightly flick the ink on the edges. This gives a really soft look to the edges and helps tie multiple colors together on your layout.

The photo above is the paper with no ink around the edges and the photo below shows the difference a little ink makes.

Another way to add ink is to use stamps. On this layout, I created a stamped border with several stamp sets and ink colors. I started with a ruler and a pencil to draw a line, then I used the protractor stamp and watermark ink to add a line of semi circles to the layout base. Then I added the turquoise doily stamped layer, followed by the red doily stamped layers in between the turquoise doilies.


Here is my layout up to this point.

I also used ink in an unexpected way on some accents and for the title on my layout. Be sure to follow the blog hop all the way back to the Memorable Seasons forum post to see how else I used my inks and to see the layout completely finished.
Be sure to leave me a comment here on my blog telling me what you think about this step. By doing so, you will be one step closer to a fabulous Memorable Seasons prize as well as getting your name entered in for a RAK from me! Also, be sure to hop all the way until the end, where you will be taken back to the Memorable Seasons forum, where you will see a complete reveal of all the Design Team's finished layouts and the full details for this challenge!
Now it's your turn to head on over to Tami's blog , where she will be giving you the 5th step in S-P-R-I-N-G
(the letter N)!
Have a nice day!
Here are a list of the blogs and in the correct order:
Memorable Seasons blog: http://www.memorableseasons.blogspot.com/
Joni's blog: http://joniparkerstuff.blogspot.com/
Kristin's blog: http://memoriesbythepageful-kristin.blogspot.com/
Megan's blog: http://www.made-by-design.blogspot.com/ **(You are Here now)**
Tami's blog: http://tami-lifeinthewhitehouse.blogspot.com/
Telah's blog: http://bamabuttercupscraps.blogspot.com/
Memorable Seasons Forum: Blog Hop Challenge Thread
Sunday, April 17, 2011
Layout Share: Drink Dr. Pepper
Here is the last page I created with the monthly kit I purchased from Memorable Seasons for January.
"Drink Dr. Pepper"

It was a really quick layout to create. I just used one of the photos for my title.

The journaling was written with the slick writer pen that came in the kit. I love these coated cardboard elements that I wrote the words on...so pretty and give a bit of dimension to the layout.

Buttons were also stitched and added around the layout for small pops of color.

Supplies Used:
Memorable Seasons January Kit: Petals and Polka Dots
(Pink Paislee Sweetness Papers, Pink Paislee Parisian Anthology elements, Brown Slick Writer)
Making Memories Buttons
White Crochet Thread
All products, including the January kit were purchased by me personally.
Saturday, April 16, 2011
Layout Share: Vintage Love
I have another layout to share today--this was created on the backside of the layout from yesterday. I just loved the backside of this paper, so I had to use it too! I will just slip the double-sided layout into a single page protector so both sides can be viewed easily.

My journaling was written along the right side of the photos. The paper had some lighter patterns printed in that area, so it worked out perfectly with being able to easily read the words.

I used the stamp set that came in the kit to add the flower accents around the page. They were just stamped on white cardstock, colored in with colored pencils, and blended with a blending stump and gamsol (odorless mineral spirits). The flowers and leaves were cut from the larger heart image. I love that I can get both looks from one stamp! I also added some stickles glitter glue around the outlines of the stamped images along with the green alphabet stickers I used for my title. The yellow lace borders were cut from a piece of coordinating pattern paper.


Supplies Used:
Memorable Seasons January Kit: Petals and Polka Dots
(Pink Paislee Sweetness Papers, Unity Stamps: Hello Friend set, EK Success Alphabet letters)
Ranger Stickles: Diamond
Uchida: Marvy Matchables Black Inkpad
White Cardstock
Zig Brown Marker
Colored pencils
Gamsol, Blending Stump
All products, including the January kit were purchased by me personally.
Friday, April 15, 2011
Layout Share: Days Like These Make Me Smile
This is another layout I created with the January monthly kit from Memorable Seasons, "Petals and Polka Dots".
 My larger photos were matted on a piece of white cardstock, then onto the kraft cardstock base. I used a film strip transparency to mat my smaller photos in the middle. I used a light grey paint dauber to lighten an area on the background pattern paper so I could stamp my title in that area. The border above the title was stamped with a dark brown StazOn inkpad, and I added the green sticker letters and stamped the words for the title above the stickers, and the word "smile" was stamped on top of the stickers that spelled out the word "smile". A grey copic marker was used to outline the green stickers to help them stand out a bit more from the background. The yellow lace border was hand-cut from some more of the pattern paper that came in the kit.

Then I used a notebook tab page to include my journaling.

Then I used a notebook tab page to include my journaling.
Supplies Used:
Memorable Seasons January Kit: Petals and Polka Dots
(Pink Paislee Sweetness Papers, EK Success Alphabet letters)
Creative Imaginations Photo Negative transparency
Kraft Cardstock (DMD Inc) and White Cardstock (CTMH)
Tsukineko Inkpad: Timber Brown StazOn
Heidi Swapp: Border Stamp
Technique Tuesday: Word stamps
Copic Marker: C1 Cool Grey
Kraft Cardstock (DMD Inc) and White Cardstock (CTMH)
Tsukineko Inkpad: Timber Brown StazOn
Heidi Swapp: Border Stamp
Technique Tuesday: Word stamps
Copic Marker: C1 Cool Grey
Ranger Paint Dauber
Zig Brown Marker
All products, including the January kit were purchased by me personally.
Thursday, April 14, 2011
Layout Share: A Taste of History
This layout was created with the January kit that members could purchase from Memorable Seasons. This month's kit was called "Petals and Polka Dots" and had so many pretty papers and embellishments.

To create this layout, I covered the brown pattern paper background with the paint dauber to soften the colors. Then I used strips of the lace paper from the kit and cut them out along the edges, following the pretty lace pattern. Circles were punched from several pattern papers to anchor my embellishments and title. I added some of the beautiful crochet flowers made by Julie, some of the pink velvet ric rac ribbon and the buttons for my embellishment clusters.

The title was created with green alpha stickers, and I added some clear glitter glue (stickles) on top. I also added dots of glitter glue in between the green seed beads I stitched to the bottom border of my page.

Supplies Used:
Memorable Seasons January Kit: Petals and Polka Dots
(Pink Paislee Sweetness Papers, crochet flowers, EK Success Alphabet letters, May Arts Pink Velvet Ribbon)
Making Memories Paper Flowers and Buttons
EK Success Circle Punch
Green Seed Beads: Craft Stash, unknown
Ranger Stickles: Diamond
Ranger Paint Dauber
Zig Black Marker
White Crochet Thread
All products, including the January kit were purchased by me personally.
Wednesday, April 13, 2011
Layout Share: Family Memories
Starting in March over at Memorable Seasons, we are choosing a member to highlight and each of the design team members use a layout of theirs for inspiration. Tracy was chosen for the month of March. This is the layout of Tracy's that used as my starting point: "Rain, Rain".

I really like how she had the photos arranged on her page and the title nested in the photos. I also loved how she added the pattern papers in sections.
Here's what I came up with:


I stamped the red labels and added some direct-to-paper inking in a cream color to age them a bit. Then I stamped the title in the center of the largest label with a turquoise inkpad and a brown marker. I love these little silverware embellishments and I added them with brads to work with my Thanksgiving theme.

The other two labels were stamped in the same manner as the larger title, and I used them for my journaling and the date.


You can also see some of the faux stitching I added with a brown marker.
Supplies Used:
WRMK: Maple Grove Pattern Papers
Jenni Bowlin: Labels Acrylic Stamps
Scrappy Cat: Family Memories Stamp
Stampin' Up Inkpad: Baha Breeze
Ranger Distress Inkpad: Fired Brick, Antique Linen
Zig Brown Marker
Making Memories: Antique Copper Brads
Gold Silverware Embellishments: unknown
Heidi Swapp: Paper Edge Distresser Tool
Sandpaper
Brown and White cardstock
All products used were purchased by me personally.
Tuesday, April 12, 2011
Sketch Share: Oven Fresh
This is a sketch designed by the talented Kristin over at Memorable Seasons.
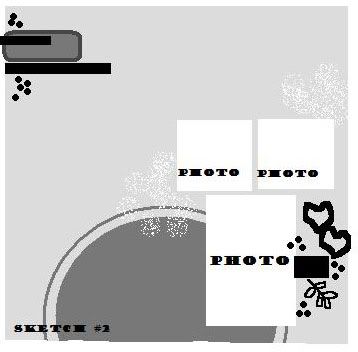
I loved this sketch by Kristin and this is what I came up with.
I added a few more photos, but I really love how this layout turned out!
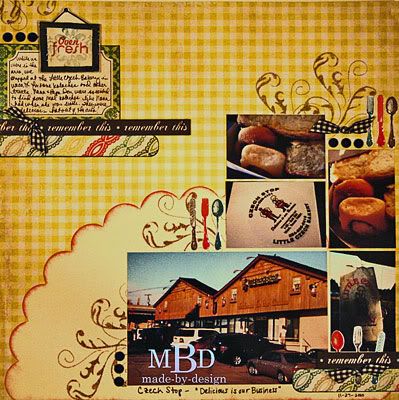
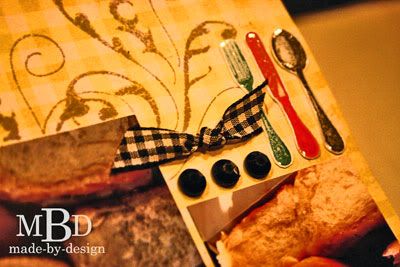
I stamped the images to create my title. The frame was stamped in black, then I added glossy accents to it for emphasis. The words "oven fresh" were added to the center of the frame, then I stamped a flourish in a lighter turquoise ink in the background of the frame. I also used stamps to add swirls on the page, and even the little silverware images were stamped, then covered in glossy accents.

Supplies Used:
Echo Park: For the Record Collection (all pattern papers)
Purple Onion Designs: Silverware stamps
Autumn Leaves Stamps: Swirls
American Crafts: Oven Fresh stamp and Frame
Studio G: Flourish stamp in center of frame
Ranger Distress Inkpads: Pumice Stone, Barn Door, Black Soot
Stampin' Up Inkpad: Bermuda Bay
Bazzill Basics: Black Gingham Ribbon
Bazzill Die Cut Cardstock: Cream Scallop
Darice: Black Gems
Ranger Glossy Accents
Zig Black Writer Pen
WRMK Corner Chomper
All supplies used were purchased personally by me.
Monday, April 11, 2011
Challenge and Layout Share: Summer Surprise
Just wanted to share another layout I created in March as my sample for the Crockpot challenge I posted over at Memorable Seasons.
I love to cook from scratch, but sometimes I need an easy, no-brainer meal for busy days. My "go-to" tool for easy meals is my crockpot. So think of my challenge this week as a crockpot--you just dump in the main ingredient, add the spices, stir and let it cook until it's done.
Megan's Crockpot Creations:
Prep: 10 min
Cook Time: 1 hour
Serves: Many
Ingredients:
Main Dish: 3+ photos (photo size is up to you)
Spices: Sanded Photo Edges, Something Stamped, and Handwritten Journaling.
Mix all four ingredients together with your choice of papers and colors, and stir.

Sanded photo edges:

This is a quick way to help your photos stand out from your background. I use a wide emory board.
Something stamped:

I also stamped the receipt background for the journaling block and the red labels.
Handwritten journaling:

So for this challenge, you need to use the following ingredients:
* 3 or more photos
* Sanded photo edges
* Something stamped
Megan's Crockpot Creations:
Prep: 10 min
Cook Time: 1 hour
Serves: Many
Ingredients:
Main Dish: 3+ photos (photo size is up to you)
Spices: Sanded Photo Edges, Something Stamped, and Handwritten Journaling.
Mix all four ingredients together with your choice of papers and colors, and stir.
Sanded photo edges:
This is a quick way to help your photos stand out from your background. I use a wide emory board.
Something stamped:
I also stamped the receipt background for the journaling block and the red labels.
Handwritten journaling:
So for this challenge, you need to use the following ingredients:
* 3 or more photos
* Sanded photo edges
* Something stamped
(if you don't own any stamps, then use some item around your house to create an image)
* Handwritten journaling.
This recipe is one of my favorites and can easily be personalized to fit your own taste. I can't wait to see what you come up with for this challenge!
Supplies Used:
Echo Park: For the Record Collection (papers, border sticker, and alpha stickers)
Jenni Bowlin: Label Acrylic Stamps, Register Stamp
Purple Onion Design: Star Stamps
Ranger Distress Inkpads: Fired Brick, Antique Linen, Weathered Wood
ColorBox Fluid Chalk Inkpad: Prussian Blue
Black Cardstock
Zig Black Marker
Sandpaper
All products used were purchased personally by me.
Saturday, April 9, 2011
Card Share: Reflections
I also created a card with some of the leftover supplies from my Memorable Seasons kit.
"Reflections Card"

For this card, I used another scrap of the core'dinations cardstock, but used the tan backside instead of the darker front and cut it into a flag shape on one end. I inked the chipboard frames with brown ink and glued them to the cream cardstock, then added a jewel in the center of each frame.

The rest of the papers I used were scraps. I didn't add a sentiment to this card so I can use it for any occasion.
Supplies Used:
* Maya Road Mini Chipboard: Circles and Squares (sold out in store)
Ranger Distress Inkpad: Brushed Corduroy
Fiskars Border Punch: Scalloped Sentiments
DMD Inc: Kraft Cardstock
* Products I received as a Design Team Member. All other products used were purchased personally by me.
Friday, April 8, 2011
Layout Share: Sweet Memories
Just wanted to share another layout I created with the Memorable Seasons design team kit.
" Sweet Memories"

For this layout, I cut the Memories top from a sheet of paper, then added the word "sweet" above it for my title.

I used the chipboard circles--solids and frames and stamped the letters using a typewriter alphabet set. For the circles that were frames, I put the stamped letter under the frame and filled it in with glossy accents. For the solid circles, I just cut around the stamped letter and glued it on top of the chipboard circle, then added glossy accents on top.

These flowers by Maya Road are SO much fun to work with! I sprayed mine with some Maya Mist, then wiped off the pearl in the center and it stayed white.

The journaling on this layout is written on the stamp set packaging with a permanent marker. I just tucked the top of the packaging under the border strip.

I added a glitter sticker along the left side, then stitched around the brown paper on the base of the layout, and distressed it.

Supplies Used:
* Maya Road Mini Chipboard: Circles and Squares (sold out in store)
Bazzill Basics: Cream Sheer Dot Ribbon
Maya Road: Elderberry Blue Maya Mist
Prima Stamp Packaging
Sewing Machine Stitching
EK Success Typewriter ABC Stamps
Ranger Distress Inkpad: Faded Jeans, Aged Mahogany
Cream Cardstock
Fiskars Border Punch: Apron Lace
Rangers Glossy Accents
Martha Stewart Permanent Black Pen
* Products I received as Design Team Member. All other products were purchased personally by me.
Thursday, April 7, 2011
Layout Share: No Matter Your Age
This was the second layout I created with the April Design Team kit from Memorable Seasons.
"No Matter Your Age"

On this layout, I did use the jewels and a glitter sticker even though it was a masculine themed layout. Just don't point that out to my hubby. :)


I stamped the little boy and dog, then colored them in with inkpads and a waterbrush. I cut them out, then adhered them to the layout with some foam tape.

To help the jewels stand out on this layout, I cut several square chipboard frames in half, then inked them with a blue inkpad and added the jewels inside. I love how this part turned out on the layout!


Supplies Used:
* Maya Road Mini Chipboard: Circles and Squares
(sold out in store)
Ranger Distress Inkpads: Pumice Stone, Antique Linen, Brushed Corduroy, Walnut Stain, Chipped Sapphire
Tsukineko: Memento Tuxedo Black Inkpad
Sassafras Lass: Burlap Alphabet Stickers
White Cardstock
Waterbrush, Sandpaper, Foam Squares
* Products I received as Design Team Member. All other products used were purchased personally by me.
Subscribe to:
Posts (Atom)